
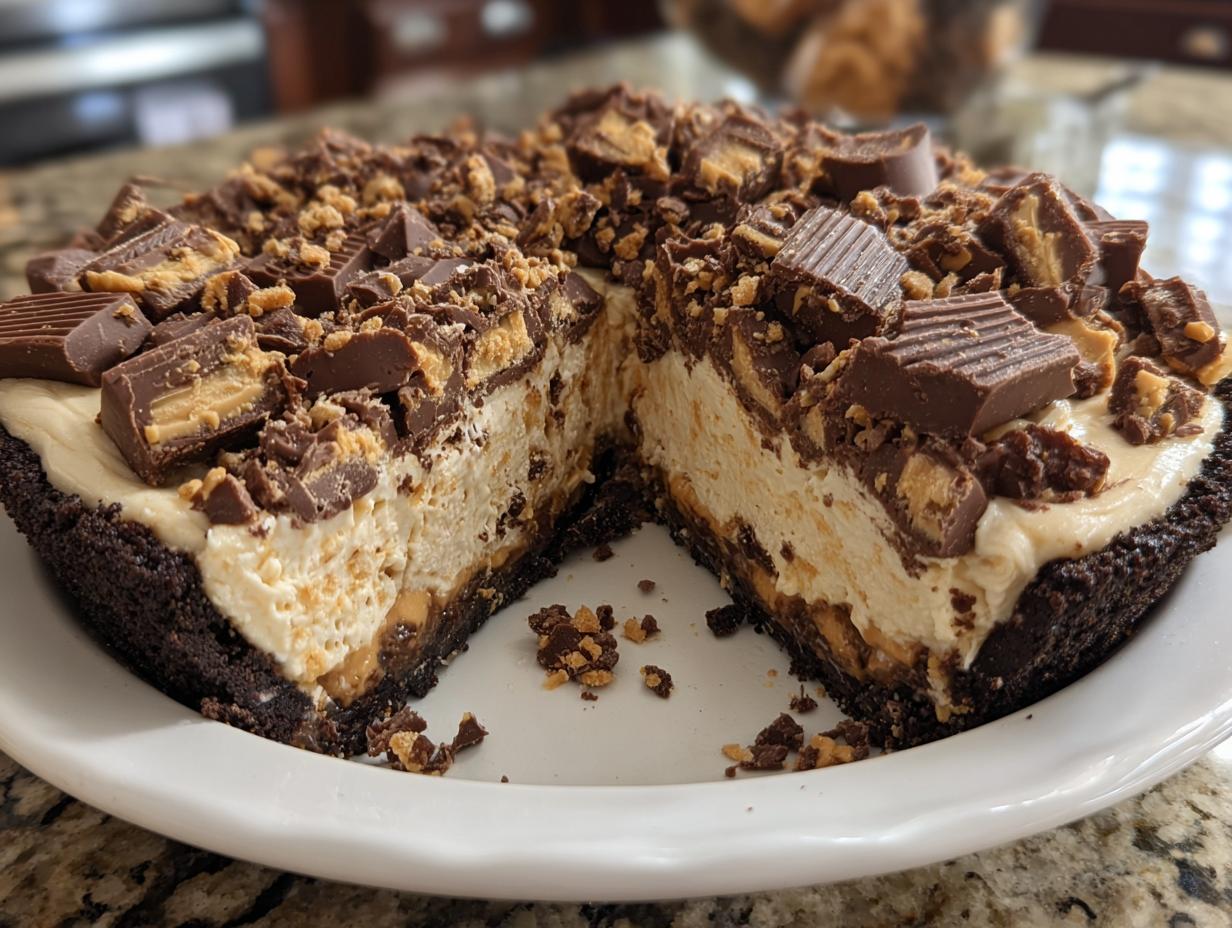
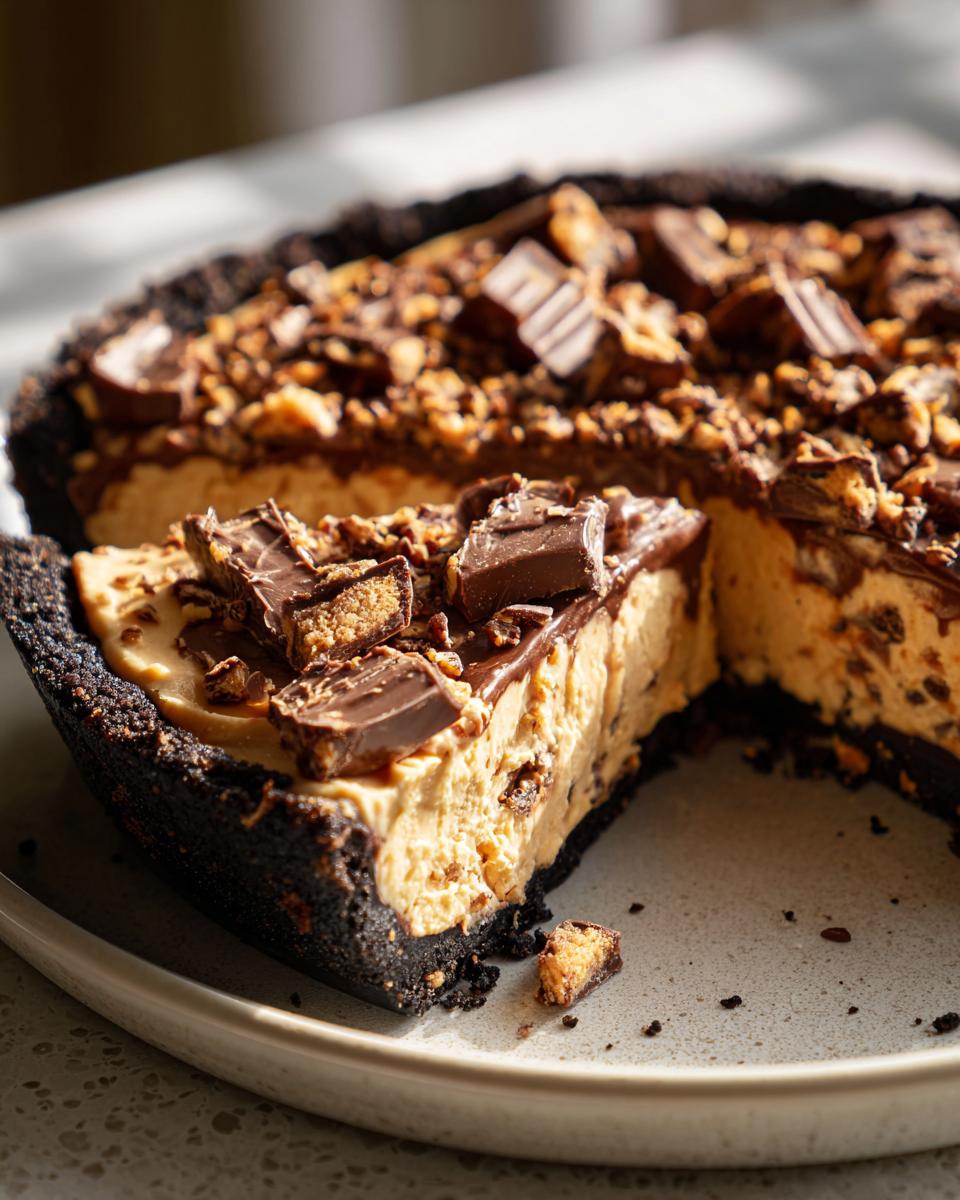
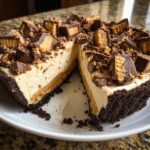
If you’ve ever felt that intense, specific craving for something salty, sweet, chocolatey, and crunchy all at once, then you know exactly why I had to share this absolute showstopper with you. Seriously, forget the complicated baking projects; this is pure, accessible joy in dessert form. I’m talking about the ultimate No-Bake Butterfinger Pie!
This recipe is the definition of what Misty Plate is all about—taking incredible flavor and stripping away anything that makes it difficult. You only need about 20 minutes of active prep time before this creamy dream heads to the fridge. It’s the kind of dessert that lets you shine at a last-minute potluck or when the kids suddenly declare they need something sweet *right now*. Trust me, coming from me, Ava Sinclair, this simple technique lets you create something truly decadent without ever turning on the oven. It’s all about making time for those cherished, simple moments!
- Why This Creamy No-Bake Butterfinger Pie Is Your New Favorite Dessert
- Gathering Ingredients for Your Easy Butterfinger Pie Recipe
- Step-by-Step Instructions for No Bake Butterfinger Pie
- Tips for the Best Butterfinger Pie Results
- Ingredient Notes and Substitutions for Your Creamy Peanut Butter Candy Pie
- Make Ahead Holiday Pie and Storage Instructions
- Serving Suggestions for This Quick Candy Bar Pie
- Frequently Asked Questions About Making Butterfinger Pie
- Share Your Experience Making This Chocolate Peanut Butter Dessert
Why This Creamy No-Bake Butterfinger Pie Is Your New Favorite Dessert
I get it; life is busy. Who has time for fussy pastry dough or worrying about oven temperatures when a serious sugar craving hits? That’s where this Butterfinger Pie swoops in to save the day. It’s designed for real home cooks who want maximum payoff for minimum effort. You’ll be shocked at how this simple combination turns into such a lush, satisfying treat.
Here’s why I always reach for this recipe when I need a guaranteed crowd-pleaser:
- Absolutely No Oven Required: Seriously, we skip the heat entirely! This makes it a lifesaver during the summer or when your oven is already full of holiday roast magic.
- Lightning Fast Prep: We’re talking about 15 to 20 minutes of active work. That’s less time than it takes to decide what movie to watch!
- Incredible Texture: The filling is so light and fluffy, but that chocolate-Oreo crust combined with the crunchy candy pieces makes it the perfect Quick Candy Bar Pie experience.
- Decadent Flavor Profile: It hits all the notes—rich peanut butter, salty chocolate, and that signature crispety-crunchety Butterfinger snap. It’s pure indulgence, and honestly, you deserve it.
Gathering Ingredients for Your Easy Butterfinger Pie Recipe
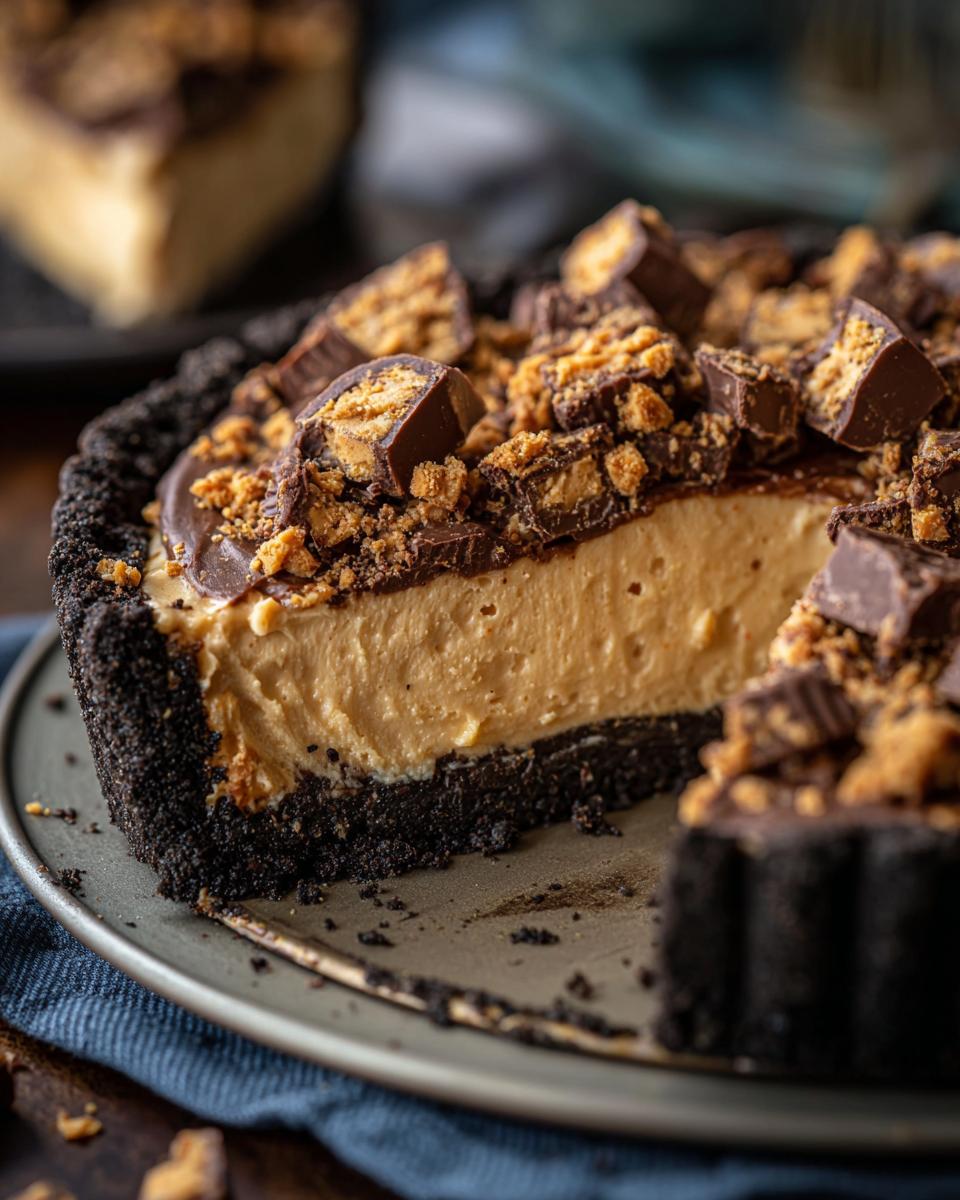
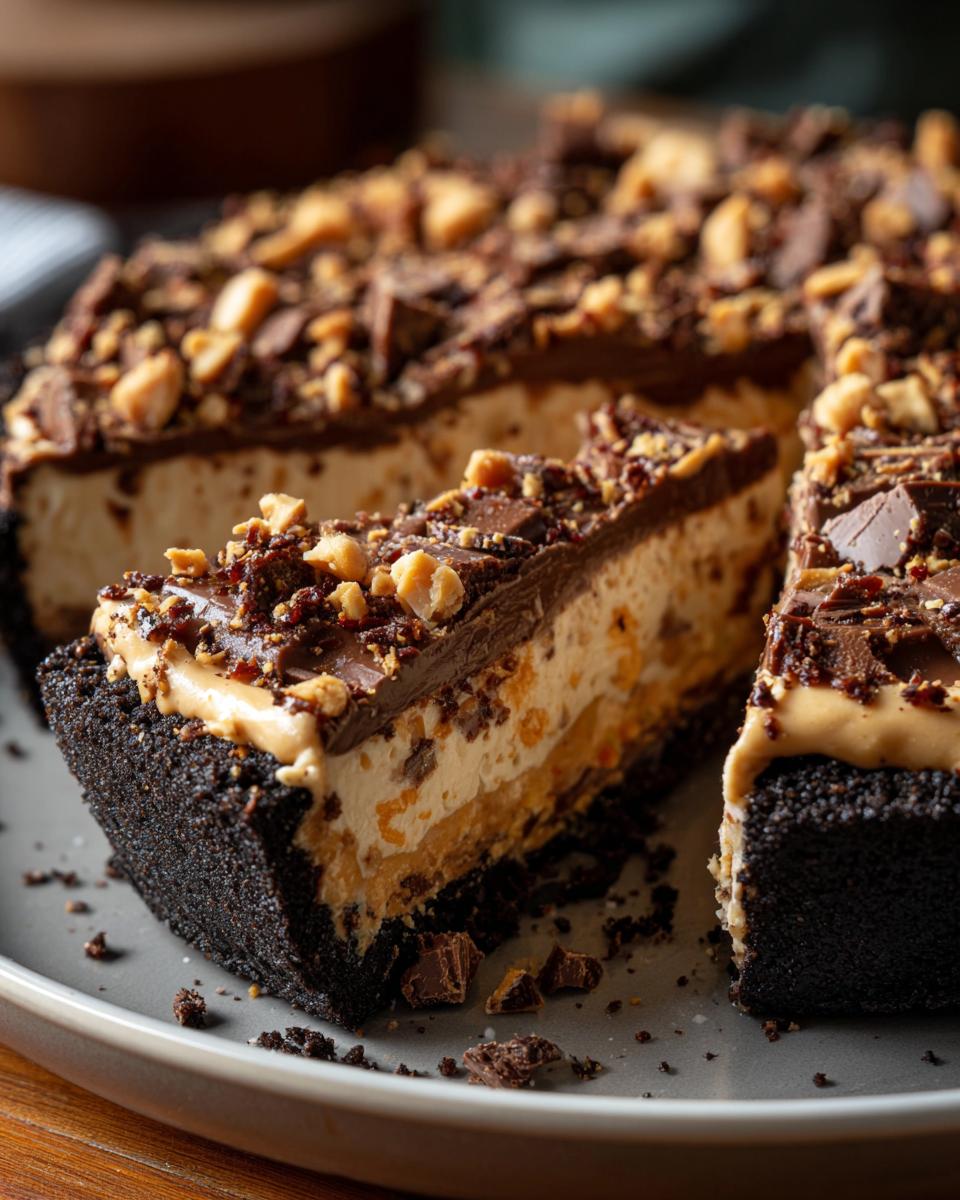
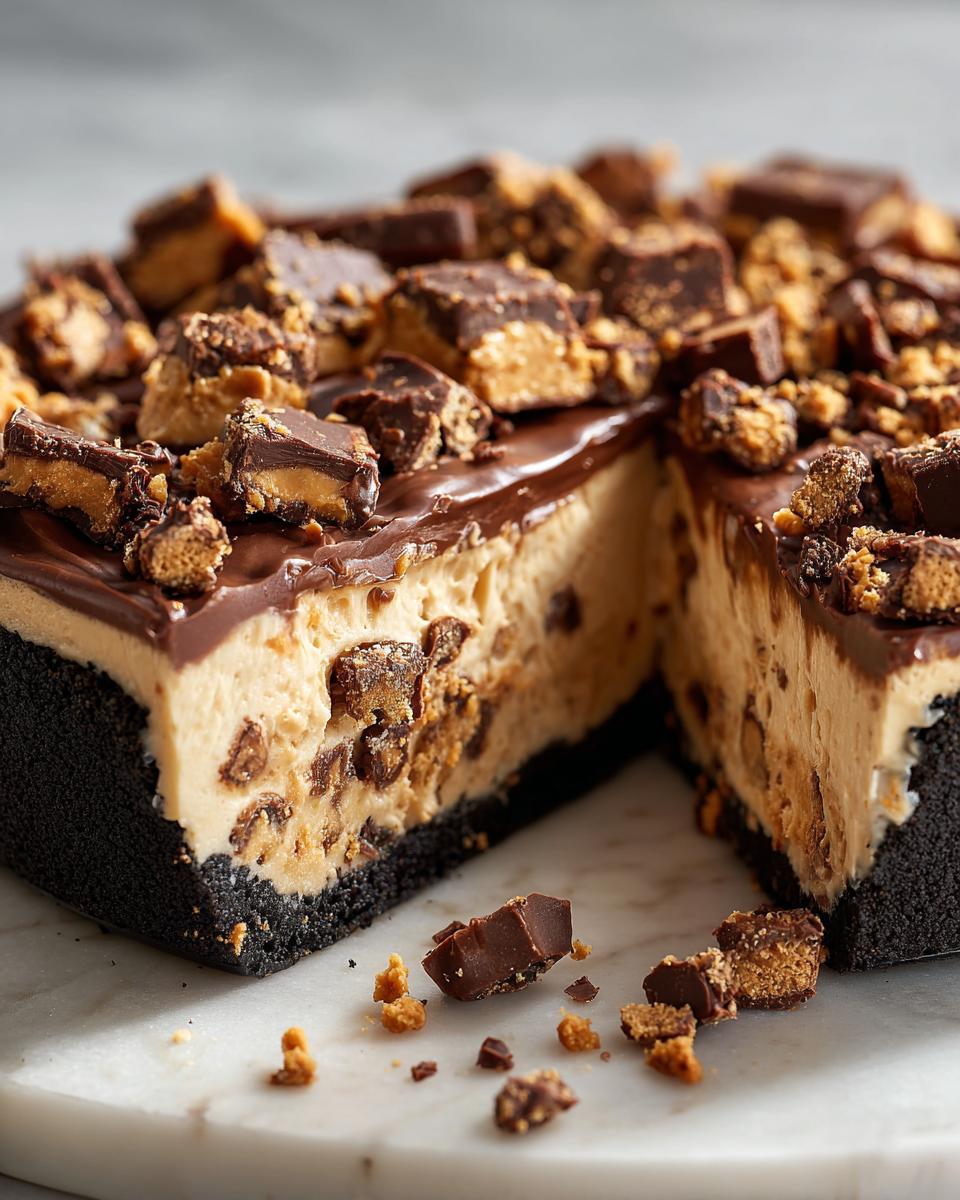
Alright, let’s talk ingredients! Because this is a no-bake treat, the quality of what you put in really matters. The beauty of this Easy Butterfinger Pie Recipe is that it uses simple pantry staples mixed with that super fun candy bar crunch. Don’t worry if you think you need a million things—we keep this surprisingly streamlined. The three main players here are chocolate cookies for the base, creamy peanut filling in the middle, and, of course, lots and lots of Butterfinger!
When you grab your ingredients, make sure you have your cream cheese out on the counter so it gets lovely and soft while you crush the cookies. That’s a little behind-the-scenes trick for silkiness. Also, pay close attention to the Butterfingers; we measure them twice for very good reasons! This precision means you get that perfect blend of salty, sweet, and crunchy throughout every slice.
I always find that having everything measured out first—my little mise en place, as the fancy folks say—makes the 20-minute assembly go smoothly. You can check out my recipe for easy no-bake bites if you want another quick treat to assemble alongside this!
Crust and Filling Components for the Butterfinger Pie
To make this happen, here is exactly what you need. If you’re making substitutions, let me know how it goes!
- 1 1/2 cups chocolate cookie crumbs (I love using Oreos, crushed finely)
- 6 tablespoons unsalted butter, melted (the real stuff makes a difference here!)
- 1 (8 ounce) package cream cheese, softened until you can easily press your finger into it
- 1 cup powdered sugar, sifted if it’s clumpy
- 1/2 cup creamy peanut butter (the smooth kind is essential for texture!)
- 1 teaspoon vanilla extract
- 1 (12 ounce) container frozen whipped topping, thawed so it’s soft but still cold
- 1 cup Butterfinger candy bars, crushed (these go *into* the filling)
- 1/2 cup Butterfinger candy bars, crushed (reserve these for sprinkling on top later!)
Step-by-Step Instructions for No Bake Butterfinger Pie
This is where the magic happens, and you’ll see how quickly this gorgeous, decadent dessert comes together. Since this is a No Bake Butterfinger Pie, the steps are mostly mixing and chilling—my favorite kind of cooking! Before you start mixing anything, grab a 9-inch pie plate and get ready to press. Remember, we want this crust sturdy enough to hold all that rich filling!
We move fast here so the crust sets up perfectly while we make the filling. If you want to see some other great ways to utilize your quick time in the kitchen, check out my tips on quick healthy lunch ideas!
Preparing the Simple Crumb Crust Dessert Base
First things first: the base. Grab that cookie crumb mixture—your melted butter slicked chocolate crumbs—and get it into your pie plate. I like to use the bottom of a dry drinking glass to really press that mixture down firmly around the bottom and up the sides. Seriously, press hard! A well-pressed crust means no sad, crumbly slices later. Once it’s packed tight, pop that whole plate into the freezer. We need it to be nice and cold while we whip up the filling, so give it at least 15 minutes in there.
Creating the Fluffy Peanut Butter Filling
Now for the glorious middle! In a big bowl, start beating that softened cream cheese until it looks smooth enough for a spa day. Then, start slowly adding your powdered sugar, followed by the peanut butter and the vanilla extract. Beat this until it’s really combined and gloriously creamy. This is the foundation of your Fluffy Peanut Butter Filling.
This next part is important for texture! Take your thawed whipped topping and gently—I mean *gently*—fold it into the peanut butter mixture. Don’t use your mixer here! You want to use a rubber spatula and cut down through the middle and fold over. We are preserving all those airy bubbles we just created. Once that swirl is mostly incorporated, fold in one full cup of your crushed Butterfinger bars. Don’t overmix; a few unmixed streaks of white is just fine.
Assembling and Chilling the Decadent Candy Dessert
Time to marry the two components! Take that chilled crust out of the freezer and carefully spoon all that incredible filling right into it. Spread it evenly across the top. At this point, your butterfinger pie smells amazing, but it’s not ready for its close-up yet. It MUST chill! Covering it loosely with plastic wrap, slide the whole thing into the refrigerator for a minimum of 4 hours. This chilling time is non-negotiable; it lets the filling set up so it slices beautifully. You can check out some other great pie inspiration on this culinary link, too: Butterfinger Pie inspiration.
Tips for the Best Butterfinger Pie Results
Even though this is a super easy recipe, a couple of tips from my kitchen to yours can seriously elevate this into the Best Butterfinger Pie Recipe ever. Remember, even simple desserts deserve high standards! It’s all about temperature and preparation before you even start mixing things together.
First, that cream cheese must be soft. I mean *soft*. If it fights you when you try to beat it, your filling will end up lumpy, and we want velvety smooth, right? Take it out at least an hour before you plan on starting. Second, the crushing of the candy bars needs care. I learned this the hard way! Place your Butterfingers inside a heavy-duty zip-top bag, lay it flat on the counter, and just tap them gently with the bottom of a heavy pan or a rolling pin. You aren’t trying to turn them to dust, just get them into nice, chunky pieces perfect for that signature crunch.
If you are looking for some simpler dishes to feature alongside this amazing dessert, browse my collection of simple appetizers!
Ingredient Notes and Substitutions for Your Creamy Peanut Butter Candy Pie
I often get asked about swapping things out in this pie. Since it’s built on such simple components, you have some minor flexibility—but stick to the core structure for that perfect slice! The filling relies heavily on that smooth texture, so please, use creamy peanut butter, not crunchy. If you use crunchy, you’ll end up with strange pockets of texture that fight against the smoothness of the whipped topping and cream cheese blend. You want the crunch to come only from the celebrated Butterfinger bars!
When it comes to the crust, the recipe calls for chocolate crumbs, which I love because it matches the chocolate coating on the candy bars perfectly. However, you absolutely can use graham cracker crumbs if that’s what you have on hand. Just remember that using graham crackers will shift the flavor profile slightly; it becomes less intensely chocolatey and a bit more classic peanut butter pie. Either way works great, but I stick to Oreos for this Chocolate Peanut Butter Dessert!
If you love quick, naturally sweet treats, you have to see my recipe for creamy banana oatmeal!
Make Ahead Holiday Pie and Storage Instructions
This pie is honestly a dream for entertaining because it’s truly a Make Ahead Holiday Pie! Since there is no baking involved, you are actually *encouraged* to make it ahead of time. The ideal scenario is chilling it for the full 4 hours, but if you can manage to make it the day before, even better! The chilling actually allows the flavors to meld beautifully, and the filling firms up just right.
Once it’s set, covering the pie loosely with plastic wrap—don’t press the wrap right onto the surface, or you might smudge your beautiful topping—and keep it tucked away in the refrigerator. It stays perfect for up to three days. When you are ready to serve, just pull it out 10 minutes before slicing for the cleanest cuts. Because it is so rich, serving it cold is always best for that light, fluffy mouthfeel we worked so hard to achieve.
If holiday baking has you stressed, remember that simplicity is key, like these simple sugar cookie bars. Check out this excellent post for more inspiration on decadent recipes: Creamy Butterfinger Pie recipe.
Serving Suggestions for This Quick Candy Bar Pie
Because this Quick Candy Bar Pie is so incredibly rich—we’re talking cream cheese, whipped topping, and peanut butter—you don’t need much on the side! In fact, a little bit of contrast really helps balance out the decadent flavor profile. My philosophy at Misty Plate is all about balance, even with dessert!
A small dollop of extra whipped cream is always nice if you happen to have some leftover from the filling. But honestly, the best pairing is a strong, slightly bitter cup of coffee. The dark roast cuts right through the sweetness beautifully. If you’re serving it to kids, maybe a little side of sliced strawberries or raspberries makes it feel slightly healthier while adding a nice tart note. Simple is the key!
For other simple meal ideas that balance rich flavors, take a peek at my simple fruit salad rotation!
Frequently Asked Questions About Making Butterfinger Pie
Can I use a different crust for this No Bake Butterfinger Pie?
Yes, you definitely can! While the Oreo crust gives you that wonderful chocolatey depth that pairs so well with the peanut butter and Butterfinger, you are welcome to use a graham cracker crust instead. Just follow the same ratios for the crumbs and melted butter. If you want to be ambitious, you could even try a shortbread cookie crust, but be aware that the flavor will change quite a bit!
Can I use crunchy peanut butter instead of creamy peanut butter?
I advise sticking to creamy! The filling relies on being ultra-smooth and fluffy, which the creamy variety guarantees. If you use crunchy peanut butter, you’ll end up with strange pockets of texture that fight against the smoothness of the whipped topping and cream cheese blend. You want the crunch to come only from the Butterfingers, and you might end up with a slightly grainy texture in the filling itself. Keep it creamy for the best texture!
How long can this No Oven Dessert stay fresh in the refrigerator?
Because this pie is entirely chilled and contains dairy products, you want to keep it covered in the fridge. It holds up fantastic for about 3 days. After that, the crust might start to absorb too much moisture and get a little soggy, though frankly, I’ve never known one of these pies to last that long! If you are looking for more dinner inspiration while you wait for those pie leftovers, check out my go-to weeknight dinner ideas.
Can I use different candy bars instead of Butterfinger, or mix them?
You absolutely can experiment! This is your kitchen, after all. If you enjoy Snickers or Reese’s Cups, chopping those up and substituting them could create a fantastic new version. Just remember that these substitutions won’t have that unique, hard, crispy shell that the Butterfinger provides. If you mix and match, let me know how it goes—I love hearing about reader adaptations! For more quick recipes, see this guide on easy no-bake recipes.
Share Your Experience Making This Chocolate Peanut Butter Dessert
I truly hope making this simple, satisfying Chocolate Peanut Butter Dessert brings a little bit of that accessible joy Ava talks about right into your home. Snap a picture of your finished pie once you’ve sprinkled those final Butterfingers on top! I would love for you to leave a star rating below and share any little tweaks you made. Your feedback helps other home cooks build confidence in the kitchen, and that’s what Misty Plate is all about.
Tips for the Best Butterfinger Pie Results
Even though this is a super easy recipe, a couple of tips from my kitchen to yours can seriously elevate this into the Best Butterfinger Pie Recipe ever. Remember, even simple desserts deserve high standards! It’s all about temperature and preparation before you even start mixing things together.
First, that cream cheese must be soft. I mean *soft*. If it fights you when you try to beat it, your filling will end up lumpy, and we want velvety smooth, right? Take it out at least an hour before you plan on starting. Second, the crushing of the candy bars needs care. I learned this the hard way! Place your Butterfingers inside a heavy-duty zip-top bag, lay it flat on the counter, and just tap them gently with the bottom of a heavy pan or a rolling pin. You aren’t trying to turn them to dust, just get them into nice, chunky pieces perfect for that signature crunch. If you want to see how other cooks tackle this amazing treat, check out this great guide: No-Bake Butterfinger Pie: 20-Minute Creamy Dessert Dream.
If you are looking for some simpler dishes to feature alongside this amazing dessert, browse my collection of simple appetizers!
Ingredient Notes and Substitutions for Your Creamy Peanut Butter Candy Pie
I often get asked about swapping things out in this pie. Since it’s built on such simple components, you have some minor flexibility—but stick to the core structure for that perfect slice! The filling relies heavily on being ultra-smooth and fluffy, which the creamy peanut butter variety guarantees. If you use crunchy peanut butter, you’ll end up with strange pockets of texture that fight against the smoothness of the whipped topping and cream cheese blend. You want the crunch to come only from the celebrated Butterfinger bars!
When it comes to the crust, the recipe calls for chocolate crumbs, which I love because it matches the chocolate coating on the candy bars perfectly. However, you absolutely can use graham cracker crumbs if that’s what you have on hand. Just remember that using graham crackers will shift the flavor profile slightly; it becomes less intensely chocolatey and a bit more classic peanut butter pie, which is lovely in its own right. Either way works great, but I stick to Oreos for this Chocolate Peanut Butter Dessert!
If you love quick, naturally sweet treats, you have to see my recipe for creamy banana oatmeal!
Make Ahead Holiday Pie and Storage Instructions
This pie is honestly a dream when hosting because it’s truly a Make Ahead Holiday Pie! Since there is no baking involved, you are actually *encouraged* to make it ahead of time. The ideal scenario is chilling it for the full 4 hours, but if you can manage to make it the day before, even better! The chilling actually allows the flavors to meld beautifully, and the filling firms up just right for those clean slices.
Once it’s set, just cover the pie loosely with plastic wrap—please don’t press the wrap right onto that beautiful topping, or you might smudge it—and keep it tucked away in the refrigerator. It stays perfect for up to three days. When you are ready to serve, just pull it out about 10 minutes before slicing to let it come off the deep chill slightly, but honestly, serving it cold is always best for that light, fluffy mouthfeel we worked so hard to achieve.
If holiday baking has you feeling overwhelmed, remember that simplicity is your best friend, just like with these simple sugar cookie bars. For more inspiration on decadent desserts that save time, check out this great guide: Creamy Butterfinger Pie | The Ultimate No-Bake Peanut Butter & Chocolate Dessert!
Serving Suggestions for This Quick Candy Bar Pie
Because this Quick Candy Bar Pie is so incredibly rich—we’re talking cream cheese, whipped topping, and peanut butter—you don’t need much on the side! In fact, a little bit of contrast really helps balance out the decadent flavor profile. My philosophy at Misty Plate is all about balance, even with dessert!
A small dollop of extra whipped cream is always nice if you happen to have some leftover from the filling. But honestly, the best pairing is a strong, slightly bitter cup of coffee. The dark roast cuts right through the sweetness beautifully. If you’re serving it to kids, maybe a little side of sliced strawberries or raspberries makes it feel slightly healthier while adding a nice tart note. Simple is the key!
For other simple meal ideas that balance rich flavors, take a peek at my simple fruit salad rotation!
Frequently Asked Questions About Making Butterfinger Pie
I love hearing all your questions! It just shows how excited you are to get this incredibly easy No Bake Butterfinger Pie into your life. Since we keep the process simple, the biggest questions usually revolve around swapping ingredients. Don’t stress about perfection; we are looking for joy in the kitchen!
Can I use a different crust for this No Oven Dessert?
Yes, you definitely can! While the Oreo crust gives you that wonderful chocolatey depth that pairs so well with the peanut butter and Butterfinger, you are welcome to use a graham cracker crust instead. Just follow the same ratios for the crumbs and melted butter. If you want to be ambitious, you could even try a shortbread cookie crust, but be aware that the flavor will change quite a bit! For some other delicious, quick meal ideas to serve alongside dessert, check out my quick weeknight dinners.
Can I use crunchy peanut butter instead of creamy peanut butter?
I really advise sticking to creamy for this one! The filling relies on being ultra-smooth and fluffy, which the creamy variety guarantees. If you use crunchy peanut butter, you mix chunky nuts into your smooth cream cheese and whipped topping base. That means the only crunch you get is from the Butterfingers, and you might end up with a slightly grainy texture in the filling itself. Keep it creamy for that perfect Fluffy Peanut Butter Filling!
How long can this No Oven Dessert stay fresh in the refrigerator?
Because this pie is entirely chilled and contains dairy products, you want to keep it covered in the fridge. It holds up fantastic for about 3 days. After that, the crust might start to absorb too much moisture and get a little soft, though honestly, I’ve never known one of these pies to last that long! It’s the perfect Make Ahead Holiday Pie because it tastes better the day after you make it.
Can I use different candy bars instead of Butterfinger, or mix them?
You absolutely can experiment! This is your kitchen, after all. If you enjoy Snickers or Reese’s Cups, chopping those up and substituting them could create a fantastic new version of a Quick Candy Bar Pie. Just remember that these substitutions won’t have that unique, hard, crispy shell that the Butterfinger provides. If you mix and match, let me know how it goes—I love hearing about reader adaptations! For more reliable guidance on this treat, take a look here: Easy No Bake Butterfinger Pie Recipe for Quick Dessert.
Share Your Experience Making This Chocolate Peanut Butter Dessert
I truly hope making this simple, satisfying Chocolate Peanut Butter Dessert brings a little bit of that accessible joy Ava talks about right into your home. Seriously, did you manage that 20-minute prep? Snap a picture of your finished pie once you’ve sprinkled those final Butterfingers on top!
I would absolutely love for you to leave a star rating below and share any little tweaks you made. Your feedback helps other home cooks build confidence in the kitchen. If you have questions or want to send me a note about how much your family devoured this, you can always reach out through my contact page!
PrintCreamy No-Bake Butterfinger Pie
Make this rich, creamy no-bake Butterfinger pie featuring a chocolate cookie crust and a smooth peanut butter filling loaded with crunchy candy pieces. This easy recipe is perfect for quick desserts.
- Prep Time: 20 min
- Cook Time: 0 min
- Total Time: 4 hr 20 min
- Yield: 8 servings 1x
- Category: Dessert
- Method: No-Bake
- Cuisine: American
- Diet: Vegetarian
Ingredients
- 1 1/2 cups chocolate cookie crumbs (like Oreo)
- 6 tablespoons unsalted butter, melted
- 1 (8 ounce) package cream cheese, softened
- 1 cup powdered sugar
- 1/2 cup creamy peanut butter
- 1 teaspoon vanilla extract
- 1 (12 ounce) container frozen whipped topping, thawed
- 1 cup Butterfinger candy bars, crushed
- 1/2 cup Butterfinger candy bars, crushed (for topping)
Instructions
- Prepare the crust: Mix the chocolate cookie crumbs and melted butter together in a bowl until combined. Press the mixture firmly into the bottom and up the sides of a 9-inch pie plate. Place the crust in the freezer while you prepare the filling.
- Make the peanut butter filling: In a large bowl, beat the softened cream cheese until smooth. Add the powdered sugar, peanut butter, and vanilla extract. Beat until the mixture is fully combined and creamy.
- Fold in the whipped topping: Gently fold the thawed whipped topping into the peanut butter mixture until just combined. Do not overmix.
- Add candy pieces: Fold in 1 cup of the crushed Butterfinger candy bars into the filling.
- Assemble the pie: Spoon the filling evenly into the chilled cookie crust. Smooth the top with a spatula.
- Chill the pie: Cover the pie loosely with plastic wrap and refrigerate for at least 4 hours, or until firm. This step is important for setting the filling.
- Garnish and serve: Before serving, sprinkle the remaining 1/2 cup of crushed Butterfinger candy bars over the top of the pie. Slice and serve cold.
Notes
- For the best texture, ensure your cream cheese is fully softened before mixing.
- If you do not have Oreo cookies, you can substitute with graham cracker crumbs for a different flavor profile in the crust.
- Crush the Butterfinger bars by placing them in a sealed plastic bag and tapping them with a rolling pin or the bottom of a heavy pan.
Nutrition
- Serving Size: 1 slice
- Calories: 450
- Sugar: 35g
- Sodium: 300mg
- Fat: 30g
- Saturated Fat: 12g
- Unsaturated Fat: 18g
- Trans Fat: 0.5g
- Carbohydrates: 40g
- Fiber: 1g
- Protein: 7g
- Cholesterol: 45mg