
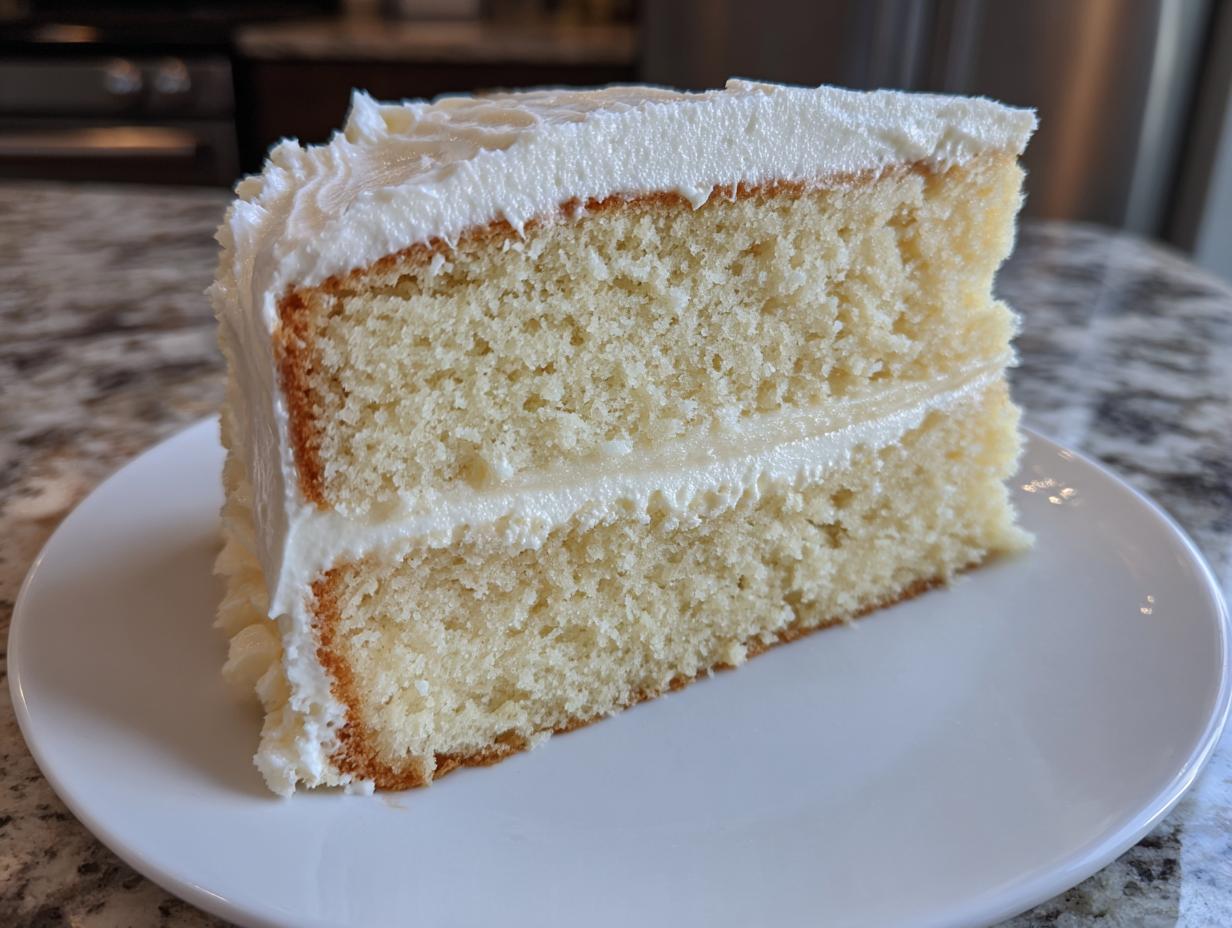
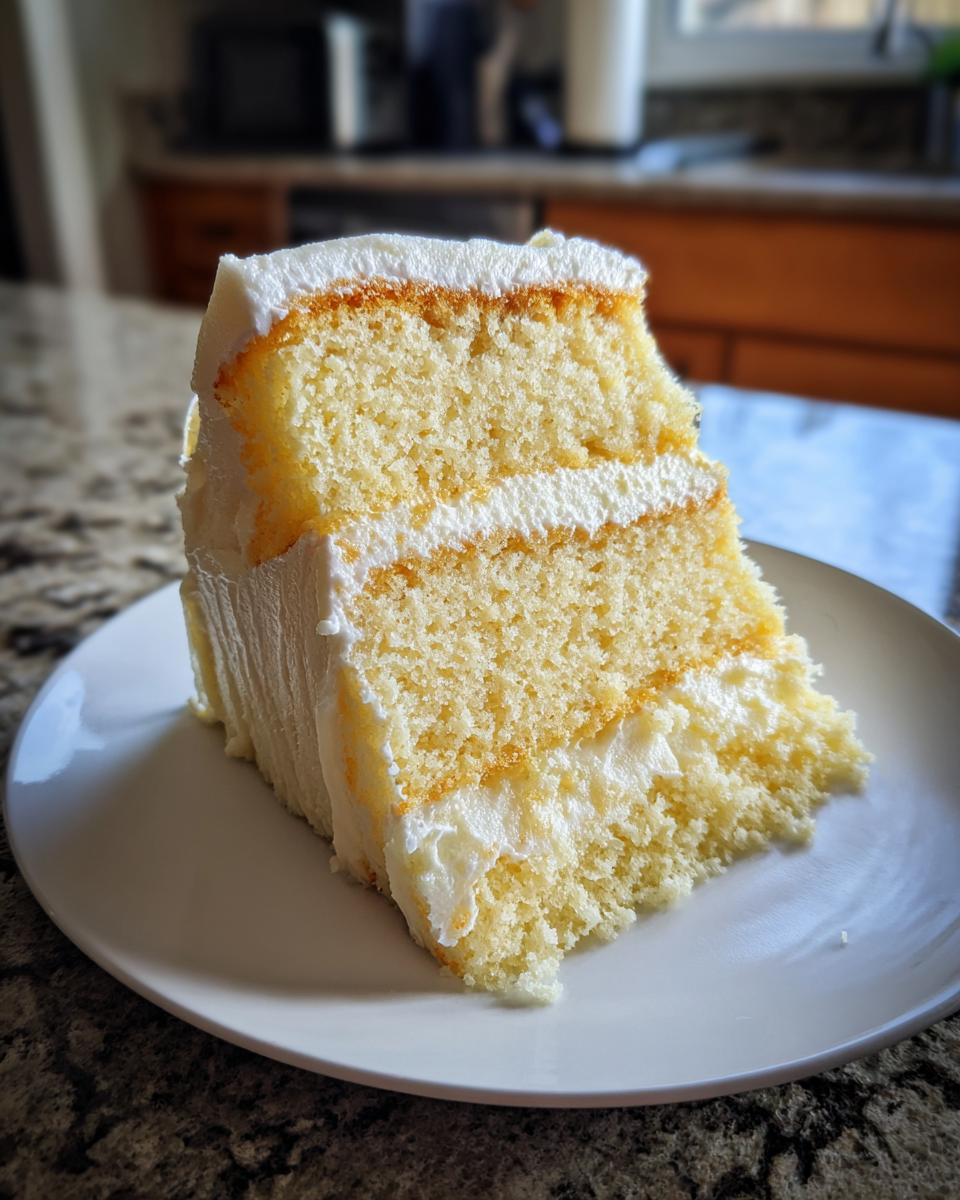
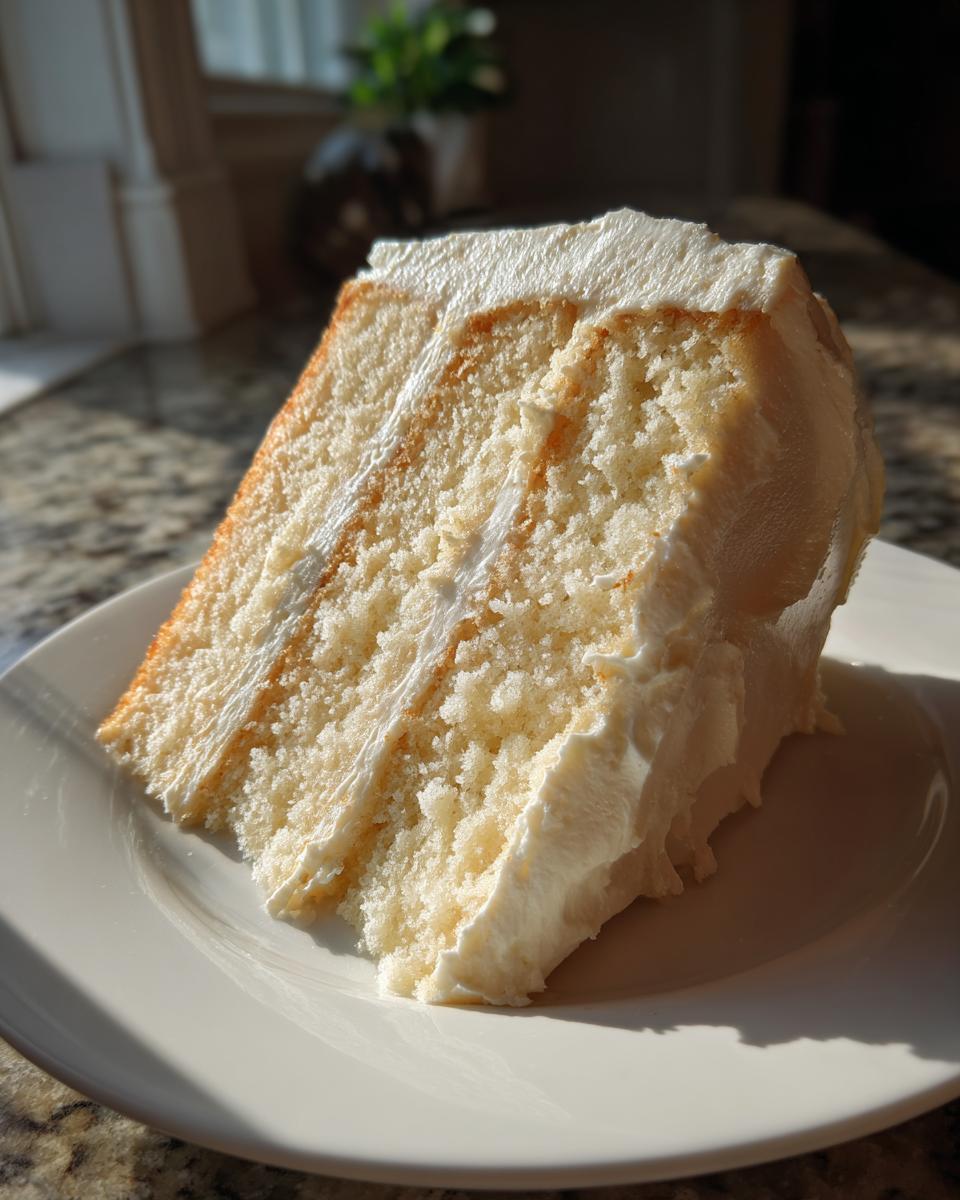
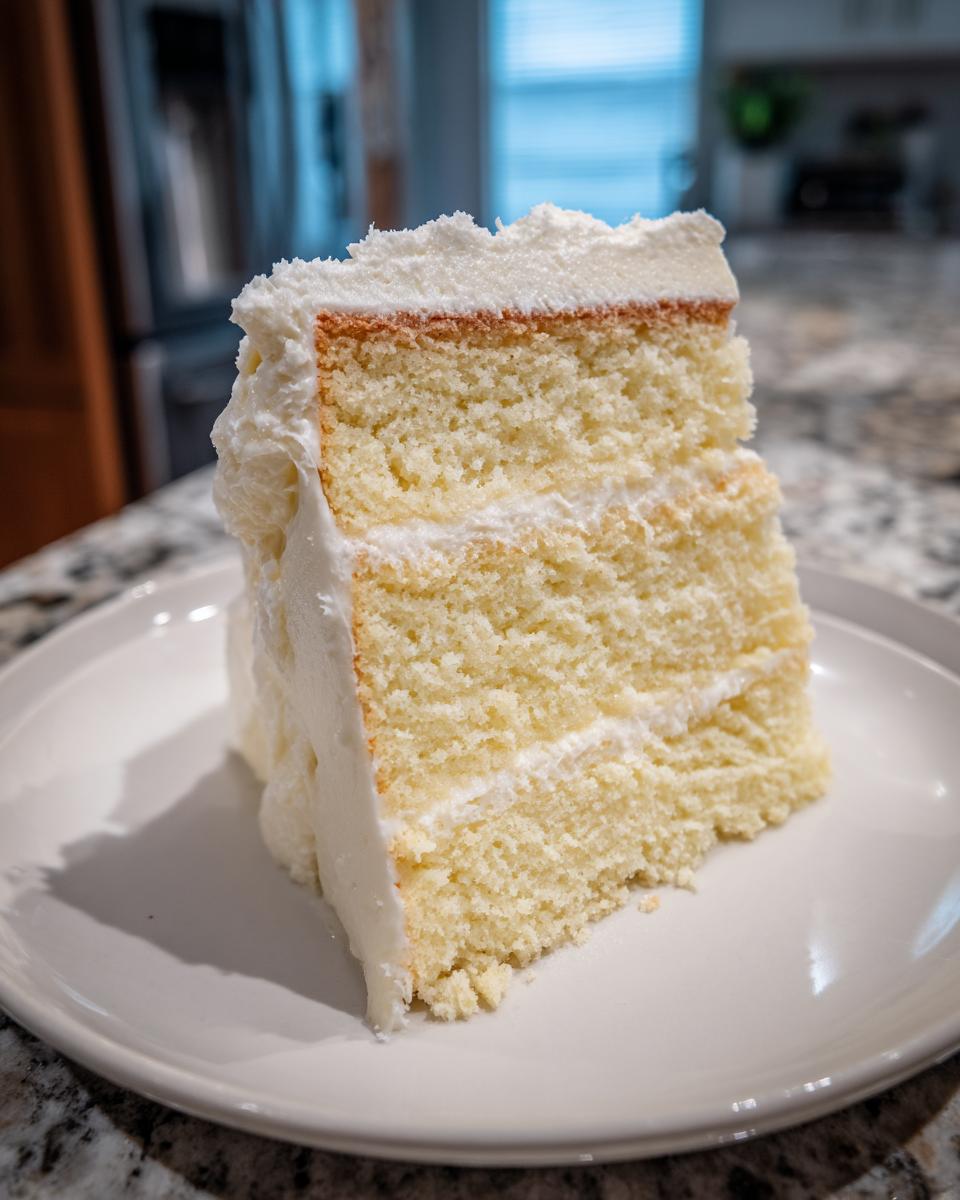
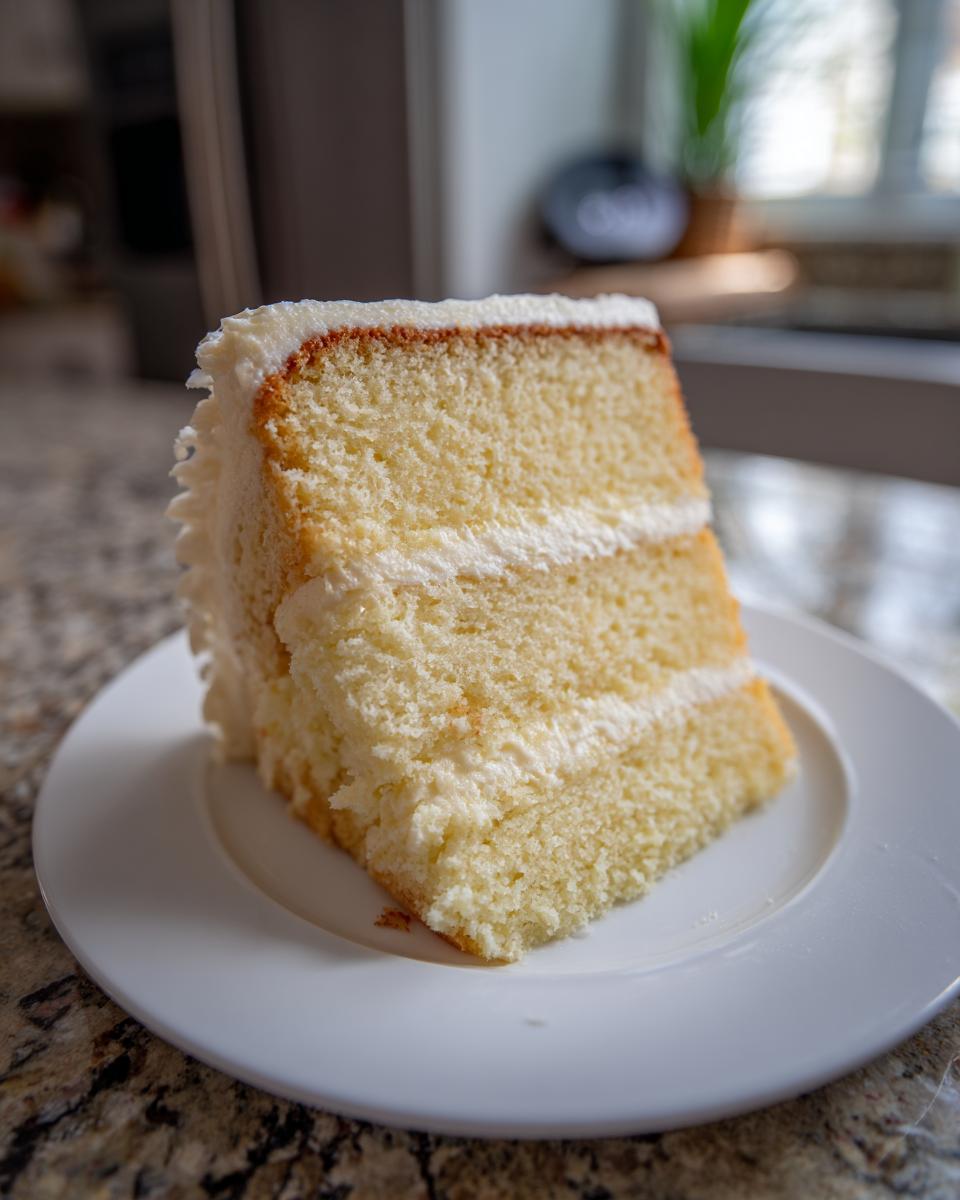
There is just something comforting about a perfect slice of classic dessert, isn’t there? For me, after stepping away from the city rush and rediscovering the joy of my family’s kitchen, that comfort always comes back to a magnificent vanilla cake. Forget fussy techniques or hard-to-find ingredients; this Moist Classic Vanilla Layer Cake with Silky Vanilla Buttercream is the most reliable vanilla cake recipe I own. This cake isn’t about showing off; it’s about that soft, tender crumb that tastes exactly like celebration. When I developed these simple, foolproof steps, I wanted to bottle up the feeling of reconnecting with home, and honestly, achieving this texture felt like coming full circle in my own cooking journey. As you’ll read more about on the Misty Plate About Page, it’s truly the centerpiece for making new, sweet memories.
- Why This Moist Vanilla Cake Recipe is Your New Favorite
- Ingredients for the Fluffy Vanilla Layer Cake
- Ingredient Notes and Substitutions for Your Vanilla Cake Recipe
- How to Prepare This Easy Vanilla Cake from Scratch
- Tips for Success with Your Homemade Vanilla Cake Recipe
- Storage and Reheating Instructions for Tender Vanilla Cake
- Serving Suggestions for a Classic Birthday Cake
- Frequently Asked Questions About This Vanilla Cake Recipe
- Nutritional Estimates for Your Simple Vanilla Dessert
- Share Your Experience Baking This Vanilla Cake Recipe
- Nutritional Estimates for Your Simple Vanilla Dessert
- Share Your Experience Baking This Vanilla Cake Recipe
Why This Moist Vanilla Cake Recipe is Your New Favorite
I’ve played with so many fancy desserts, but when I need something absolutely dependable—something that just *works* every single time—I come back to this vanilla cake recipe. It’s a total sweetheart for anyone who feels nervous about baking layers. Trust me, this one is built for success, not stress!
What sets this apart from those cakes that dry out by the time you cut the second slice? It’s the simple science behind getting that perfect crumb. Honestly, you’ll want to bookmark this recipe today.
- It’s genuinely budget-friendly and uses pantry staples you already have.
- It bakes up incredibly tender; it just melts right in your mouth.
- It chills beautifully, making it the perfect Beginner Friendly Cake Recipe for layer decorating.
Texture and Flavor Profile of Our Classic Vanilla Cake
When you slice this cake, you’ll see soft, fluffy layers—not dense, not tough, just beautifully yielding. The flavor is pure, rich vanilla; it tastes like a classic celebration cake should taste. If you’re looking for the Best Vanilla Cake Recipe that screams quality without requiring you to hunt down specialty flours, this is it. It’s the simple, honest flavor that always brings people back for seconds.
Ingredients for the Fluffy Vanilla Layer Cake
Okay, let’s talk ingredients. You know how much I believe that great results start with respecting the base components? For this Moist Vanilla Cake Recipe, we are sticking to the basics that make magic happen. We aren’t throwing anything complicated in here, but the preparation of those basics really matters, especially when we talk about that super soft texture.
Please don’t skip bringing out the butter, eggs, and milk ahead of time. It sounds like a small thing, but letting them warm up slightly is the secret handshake for a batter that comes together smoothly without struggling against the cold. Take a peek at what you’ll need for both the cake layers and that dreamy, cloud-like frosting we are putting on top.
Cake Batter Components
- 1 3/4 cups all-purpose flour
- 1 3/4 cups granulated sugar
- 1 tablespoon baking powder
- 1/2 teaspoon salt
- 1/2 cup unsalted butter, softened
- 2 large eggs
- 1 cup whole milk
- 2 teaspoons pure vanilla extract
Silky Vanilla Buttercream Frosting Ingredients
This frosting is why you’ll want to make this cake for special occasions! It whips up ridiculously light and creamy. Make sure the butter for this is perfectly softened—not melted, just soft to the touch—so it creams beautifully and gives us that gorgeous silky mouthfeel.
- 1 cup unsalted butter, softened
- 4 cups powdered sugar
- 1 teaspoon pure vanilla extract
- 3 tablespoons heavy cream
Ingredient Notes and Substitutions for Your Vanilla Cake Recipe
When you’re baking something as classic as this vanilla cake recipe, the tiniest details in ingredient management make the biggest difference between a good cake and a legendary one. I know life is busy, and sometimes you need to swap things out, but I want to make sure you get that soft, perfect result Ava promises. A lot of my knowledge here comes from experimenting when my pantry was nearly bare in the early days—figuring out what moves you absolutely cannot skip.
For instance, the quality of your vanilla extract matters immensely here since it’s the star flavor! Don’t reach for that imitation stuff. Pure vanilla extract is what gives you that warm, bakery-level depth of flavor in this otherwise simple cake.
Achieving the Softest Batter
If you take one thing away from this section, let it be this: temperature matters! You absolutely have to bring your eggs and milk out of the fridge about an hour before you start. Cold ingredients fight each other when they meet the creamed butter, and that fight ends up creating a curdled, uneven batter.
When everything is at room temperature, they emulsify—that means they blend together beautifully—creating that silky, smooth backdrop for the flour. This is the foundation for having a truly Tender Vanilla Cake that hugs the frosting perfectly. If your batter looks weird when you add the milk, it’s usually because the eggs were too cold. Don’t panic, but definitely try to use room temperature components next time!
Also, I want to make sure you see the note about buttermilk. If you want your cake to lean slightly more toward the white side and taste even richer, swap that whole milk for buttermilk. It adds a lovely little tang and breaks down the gluten just enough to keep everything extra soft. It’s a wonderful upgrade for celebrations!
How to Prepare This Easy Vanilla Cake from Scratch
Alright, let’s get baking! This is where the magic happens, and honestly, because the method is so straightforward, this is why I call it my favorite Easy Vanilla Cake. We are relying on the way we mix the ingredients, not complicated steps. Remember to preheat your oven to 350°F (175°C) right now, and take a minute to generously grease and flour those two 8-inch pans. Nobody wants a beautiful cake stuck in the bottom, trust me!
Mixing the Cake Batter
First things first, we are building the framework. Grab your largest bowl and whisk the flour, the sugar, the baking powder, and the salt together. You want those dry things happy and distributed! Now, here’s a technique I picked up—add your softened butter directly into that dry mixture. Using your electric mixer on low, beat it until it looks like coarse, sandy crumbs. This step coats the flour in fat, which is a secret weapon for keeping the final cake moist—it keeps the gluten from getting cranky later.
In a separate bowl, just whisk your room-temperature eggs, milk, and vanilla really well. Then, slowly stream those wet things into your sandy butter/flour mix while the mixer is on low speed. Once it looks almost combined, turn the speed up to medium and beat it for exactly two minutes. That’s it! Seriously, stop mixing as soon as that time is up. Over-beating here develops too much structure, and we want fluffy, not tough!
Baking and Cooling the Layers
Divide that gorgeous batter evenly between your prepared pans. You’ll pop these into the 350°F (175°C) oven for about 30 to 35 minutes. Keep an eye on them! The best sign they are ready isn’t just the color—it’s when you stick a wooden pick right into the center and it slides out clean, maybe with a moist crumb or two clinging to it, but no wet batter. That means the inside is perfectly cooked without drying out the edges.
Crucially, don’t rush the cooling! Let the layers rest in the pans for a full 10 minutes. This gives them time to set up just enough so they don’t immediately tear when you flip them out onto your wire rack to cool completely. If you’re making this cake for a gathering, you can wrap those cooled layers in plastic wrap and they’re perfect until the next day. For some great inspiration on presentation, check out this beautiful vanilla layer cake.
Creating the Silky Vanilla Buttercream Frosting
While those cakes are cooling (or the next morning, I won’t judge!), we make the topping. This frosting deserves its own applause. First, whip that cup of softened butter on its own until it’s pale and fluffy—just like you’re fluffing a pillow. Slowly, gradually, start adding your four cups of powdered sugar. If you dump it all in, you’ll spend an hour cleaning your ceiling, trust me on this one.
Once most of that sugar is incorporated, add your vanilla and the heavy cream. Now, this is the final magic move: beat it on high speed for a solid three to four minutes. You want it to lighten up, become airy, and achieve that amazing, decadent, creamy/silky texture we are after. Once your layers are totally cool, it’s time to stack and cover!
Tips for Success with Your Homemade Vanilla Cake Recipe
I want you to have the best experience with this vanilla cake recipe possible, so let me give you my top three non-negotiable tips. These are the little things I learned the hard way so you don’t have to end up with a crumbly disaster!
First, let’s talk about measuring flour. This is the most common reason cakes turn out dry or dense. Don’t scoop your measuring cup directly into the bag of flour! That packs it in, and suddenly you’ve used way too much. Instead, gently spoon the flour into your measuring cup until it overflows slightly, and then use a flat knife to level it off. This guarantees the right amount for that lovely, tender crumb we are aiming for.
Second, when you’re frosting, if your buttercream seems too soft or soupy right after you mix it, don’t add more powdered sugar immediately! That often happens because the butter softened too much while mixing the sugar. Just pop the entire bowl into the fridge for 10 or 15 minutes. Chilling forces the fat to firm up again. Then, you can whip it again on high speed, and it will come out fluffy and perfect—not greasy, not runny!
Third, for the layers themselves, if you notice your cake doming slightly in the middle during baking, use a damp cake strip around the outside of the pan. These are just strips of fabric soaked in water that you wrap around the outside edge. They insulate the pan so the edges don’t cook faster than the center. This helps your layers bake up flatter, which means less scraping and trimming later, saving you time for decorating!
Storage and Reheating Instructions for Tender Vanilla Cake
I’m so glad you asked about storage! Because this cake is so wonderfully moist, we want to make sure it stays that way, whether it’s for a birthday party centerpiece or just a quick afternoon treat for yourself. You absolutely should never let this beautiful cake dry out!
If you’ve already frosted the whole thing, keeping it fresh is pretty simple. Since we are using a butter-based buttercream, you do need to keep it cool, but not frigid. A cake dome or an airtight container placed on the counter is usually perfect for a day or two. Seriously, room temperature lets the cake’s flavor shine, and the frosting stays soft and spreadable.
Storing the Assembled Cake
If you aren’t eating the whole thing right away, cover the assembled cake loosely with plastic wrap, making sure the wrap doesn’t touch the frosting decoration too much, or you’ll smudge your hard work! You can keep it safely at cool room temperature for up to two days. If your kitchen runs really warm, or if you’re using a custard-based filling (which we aren’t in this recipe, thank goodness!), then the fridge is the spot.
If the fridge is necessary, remember to pull the cake out at least an hour before serving. Cold mutes flavor and makes the butter in both the cake and the frosting firm up too much. We want that soft, yielding bite, so let it warm up on the counter!
Storing Individual Slices
If you just have a few leftover slices, this is my go-to method for keeping them perfect. Wrap each slice *tightly* in plastic wrap, making sure you get all the exposed cake edges sealed up. Then, pop those wrapped slices into a freezer-safe bag or container. They do great in the freezer for about a month!
When you get a craving later? Just pull a slice out, unwrap it, and let it sit on the counter for about 30 to 45 minutes while it defrosts. It comes back to life tasting just as soft and tender as the day you baked it. It’s foolproof for satisfying those random sweet cravings!
Serving Suggestions for a Classic Birthday Cake
Now that you have this beautiful, fluffy cake ready to go, the real fun starts—making it look like the showstopper it is! Since this is such a wonderful, classic base, you honestly don’t need to do much, but I love giving it a little extra pop of freshness or something extra special, especially when it’s for a birthday. That’s the joy of having a perfect vanilla cake recipe; it’s ready for any party!
Here are a couple of ways I like to present mine when tables need dressing up:
For Freshness and Contrast
If you’re worried about the richness of the buttercream (which you shouldn’t be, because it’s amazing!), pairing it with fresh fruit slices cuts through that sweetness beautifully and adds vibrant color. My favorite combination for a Classic Birthday Cake is simple sliced strawberries or raspberries arranged just around the edge of the bottom layer before you stack it, or scattered artfully over the top if you prefer a simpler frosting application.
You could also grate a little bit of fresh lemon zest right over the top surface just before serving. The tiny, bright droplets of flavor really wake up that pure vanilla essence. It’s subtle, but everyone notices when you add that extra bit of care!
The Perfect Pairing Companion
Sometimes the setting calls for more than just cake. If you’re serving this for an afternoon event or a quiet Sunday dessert, remember what goes perfectly with a rich vanilla crumb: coffee! A strong, dark roast cuts through the sugar content just right.
For a more decadent pairing, especially on a chilly evening, I’ll serve slices warm—just warm them gently in the microwave for about 10 seconds. Top that warm slice with a scoop of high-quality vanilla bean ice cream (yes, more vanilla!) and maybe a drizzle of caramel sauce. It turns this Simple Vanilla Dessert into a major event. Honestly, you can’t mess this up because the cake itself is so reliable!
Frequently Asked Questions About This Vanilla Cake Recipe
I knew you’d have questions! When you’re making something as cherished as a classic layer cake, you want all the details ironed out before you even tie your apron. I took a peek at what folks usually ask when they find a great vanilla cake recipe, and I gathered the answers right here. I hope this helps you feel completely confident before you even heat up the oven!
Can I use this recipe to make a 9×13 sheet cake instead of layers?
Oh, absolutely yes! That’s one of the great things about having a reliable recipe in your back pocket—flexibility. If you want a Vanilla Sheet Cake instead of two layers, pour all the batter into a generously greased and floured 9×13 inch pan. Because it’s shallower than the two 8-inch rounds, it will bake a little faster. Keep an eye on it starting around the 25-minute mark. You’re looking for that same clean wooden pick test. This is a fantastic, quick way to handle potlucks!
How can I make this cake whiter, like a classic white cake?
This recipe already leans pretty light, thanks to using granulated sugar instead of brown, but if you are aiming for that textbook white, bakery look, you have a couple of options. The biggest factor is the egg yolks. Yolks lend richness and color. If you want a nearly white layer cake, you can swap your two whole eggs for three or four egg whites only. Just make sure you are still getting enough fat and liquid volume, which is why I suggest using buttermilk instead of whole milk if you make that swap—it helps keep things moist and tender!
I’m worried about my lack of baking skill; is this truly a beginner-friendly cake recipe?
I promise you, yes! If you can use a mixer and follow these steps, you can master this Easy Vanilla Cake. We are using the creaming method (butter and sugar), which is standard, and we aren’t doing any complicated folding or separating whites. The key for beginners is simple: don’t overmix the batter once the flour and liquids are in. Keep the mixer speed low once those wet ingredients go in. That’s it! Honestly, this is the recipe I give to my friends who only bake cookies once a year.
Can I substitute vegetable oil for the butter in the cake layers?
That’s a tough one for me, because honestly, I love the richness and flavor that butter brings to this Homemade Vanilla Cake. Butter helps create structure through the creaming process, which gives us that beautiful fluffy lift. If you swap butter for oil, you will certainly end up with a moist cake—oil guarantees that!—but it will lose some of the delicate texture we worked so hard for. It turns into a more oil-based cake, which is fine, but it won’t have the same tender crumb profile. I highly recommend sticking to the softened butter for this Classic Vanilla Cake!
If you run into any trouble or want to share your success, please don’t hesitate to reach out through the contact page! And if you want to see how others have styled theirs, check out this gorgeous version here.
Nutritional Estimates for Your Simple Vanilla Dessert
Now, I always say that you shouldn’t worry about tracking calories when you’re making a beautiful celebration cake like this one, because the joy it brings is truly immeasurable! But because so many of you ask, I always run the numbers for transparency. Remember, these estimates apply to one slice of the layer cake with the recommended amount of frosting.
These figures are based on standard measurements and a typical yield of 10 servings per the recipe card. Think of this as a fun guide, not a strict mandate for your next birthday party!
- Serving Size: 1 slice
- Calories: 450
- Sugar: 55g (Yes, it’s a celebration!)
- Fat: 22g
- Carbohydrates: 60g
- Protein: 4g
The fat content is high, yes, but that’s because of the lovely unsalted butter we use in both the cake and the Vanilla Buttercream Frosting. That fat is what delivers that melt-in-your-mouth texture we are aiming for, so it’s all worth it for this Simple Vanilla Dessert!
Share Your Experience Baking This Vanilla Cake Recipe
Seeing your beautiful bakes come to life truly makes my day. When I think about taking the time to bake something from scratch, especially a beautiful Birthday Cake Vanilla masterpiece, the best part is sharing the success.
If you followed these steps and made this Moist Vanilla Cake Recipe, please let me know how it went! Did the frosting turn out perfectly silky? Did your family ask for the recipe immediately? Leave a star rating right below and tell me about it in the comments. Your feedback helps others feel confident trying this recipe, and honestly, your encouragement means the world to me here at Misty Plate. Happy baking!
Nutritional Estimates for Your Simple Vanilla Dessert
Now, I always say that you shouldn’t worry about tracking calories when you’re making a beautiful celebration cake like this one, because the joy it brings is truly immeasurable! But because so many of you ask, I always run the numbers for transparency. Remember, these values are just estimates based on standard ingredient usage, so they are really just a fun guide for your Simple Vanilla Dessert!
We are using creamy butter and full sugar here because that’s what makes this cake taste like it came from a wonderful, old-fashioned bakery. It’s all about balance, right? You deserve a treat, and this gives you that perfectly moist crumb and rich vanilla flavor without any guilt attached to the celebration!
- Serving Size: 1 slice
- Calories: 450
- Sugar: 55g (Yes, it’s a celebration!)
- Fat: 22g
- Carbohydrates: 60g
- Protein: 4g
The fat content is a little higher, yes, but that’s thanks to the lovely unsalted butter we use in both the cake and the Vanilla Buttercream Frosting. That fat is what delivers that melt-in-your-mouth texture we are finally getting from this vanilla cake recipe, so honestly, it’s all worth it!
Share Your Experience Baking This Vanilla Cake Recipe
Now that you’ve seen how this vanilla cake recipe comes together—from weighing the flour correctly to beating that dreamy buttercream—I truly can’t wait for you to try it! Seeing your beautiful bakes come to life truly makes my day here at Misty Plate. When I think about taking the time to bake something from scratch, especially a beautiful Classic Birthday Cake masterpiece, the best part is sharing the success.
If you followed these steps and made this Moist Vanilla Cake Recipe, please let me know how it went! Did the frosting turn out perfectly silky? Did your family ask for the recipe immediately? Seriously, I want to hear all about it. Did your kitchen smell amazing when the vanilla filled the air?
Leave a star rating right below and tell me about your experience in the comments. Your success stories and tips about baking this Easy Vanilla Cake help the next person feel confident walking into their own kitchen. We are all learning together how to infuse our busy lives with the simple, warm joy of a home-cooked dessert. Happy baking, friends!
PrintMoist Classic Vanilla Layer Cake with Silky Vanilla Buttercream
This is a reliable recipe for a soft, fluffy vanilla layer cake made from scratch. It uses simple ingredients to create a moist crumb perfect for any celebration, topped with a creamy vanilla buttercream frosting.
- Prep Time: 20 min
- Cook Time: 35 min
- Total Time: 55 min
- Yield: 10 servings 1x
- Category: Dessert
- Method: Baking
- Cuisine: American
- Diet: Vegetarian
Ingredients
- 1 3/4 cups all-purpose flour
- 1 3/4 cups granulated sugar
- 1 tablespoon baking powder
- 1/2 teaspoon salt
- 1/2 cup unsalted butter, softened
- 2 large eggs
- 1 cup whole milk
- 2 teaspoons pure vanilla extract
- For the Frosting: 1 cup unsalted butter, softened; 4 cups powdered sugar; 1 teaspoon pure vanilla extract; 3 tablespoons heavy cream
Instructions
- Preheat your oven to 350°F (175°C). Grease and flour two 8-inch round cake pans.
- In a large bowl, whisk together the flour, sugar, baking powder, and salt.
- Add the softened butter to the dry ingredients. Beat with an electric mixer on low speed until the mixture resembles coarse sand.
- In a separate bowl, whisk together the eggs, milk, and vanilla extract.
- Gradually add the wet ingredients to the dry ingredients, mixing on low speed until just combined. Increase the speed to medium and beat for two minutes until the batter is smooth. Do not overmix.
- Divide the batter evenly between the prepared cake pans.
- Bake for 30 to 35 minutes, or until a wooden pick inserted into the center comes out clean.
- Let the cakes cool in the pans for 10 minutes before inverting them onto a wire rack to cool completely.
- To make the frosting, beat the softened butter until creamy. Gradually add the powdered sugar, mixing until combined. Add the vanilla extract and heavy cream. Beat on high speed until the frosting is light and fluffy.
- Once the cakes are completely cool, place one layer on a serving plate. Spread about one-third of the frosting over the top. Place the second layer on top and frost the top and sides of the entire cake.
Notes
- For the best texture, bring your eggs and milk to room temperature before mixing.
- You can use this recipe to make a single 9×13 sheet cake; adjust baking time as needed.
- If you want a whiter cake, substitute whole milk with buttermilk.
Nutrition
- Serving Size: 1 slice
- Calories: 450
- Sugar: 55g
- Sodium: 250mg
- Fat: 22g
- Saturated Fat: 14g
- Unsaturated Fat: 8g
- Trans Fat: 0.5g
- Carbohydrates: 60g
- Fiber: 1g
- Protein: 4g
- Cholesterol: 80mg